
Congrats on your new Flanny 5.0! This bike frame set a new bar for the Flaanimal platform, one that has been in a continuous state of evolution since its inception in 2015. The innovative construction and massively adaptable feature set of this bicycle platform represent what we consider to be a new high water mark for adventure bikes. Here are some unique features and considerations for your frame, as well as specs to guide and inspire your future setups, which we can assure you will change many times as you test the limits of this quiver-killer.
Slider System…
The Flaanimal has featured a sliding dropout system since the 1.0, and has remained in its DNA for its stellar functionality benefits. These include: allowing tucking or pulling the wheel to adjust for tire clearance or effective chainstay length (which changes how it handles), adjusting singlespeed chain tension, or swapping chainrings by dramatic tooth counts without having to cut your chain or buy a new one. Here are some notes on the setup and use of the sliders.
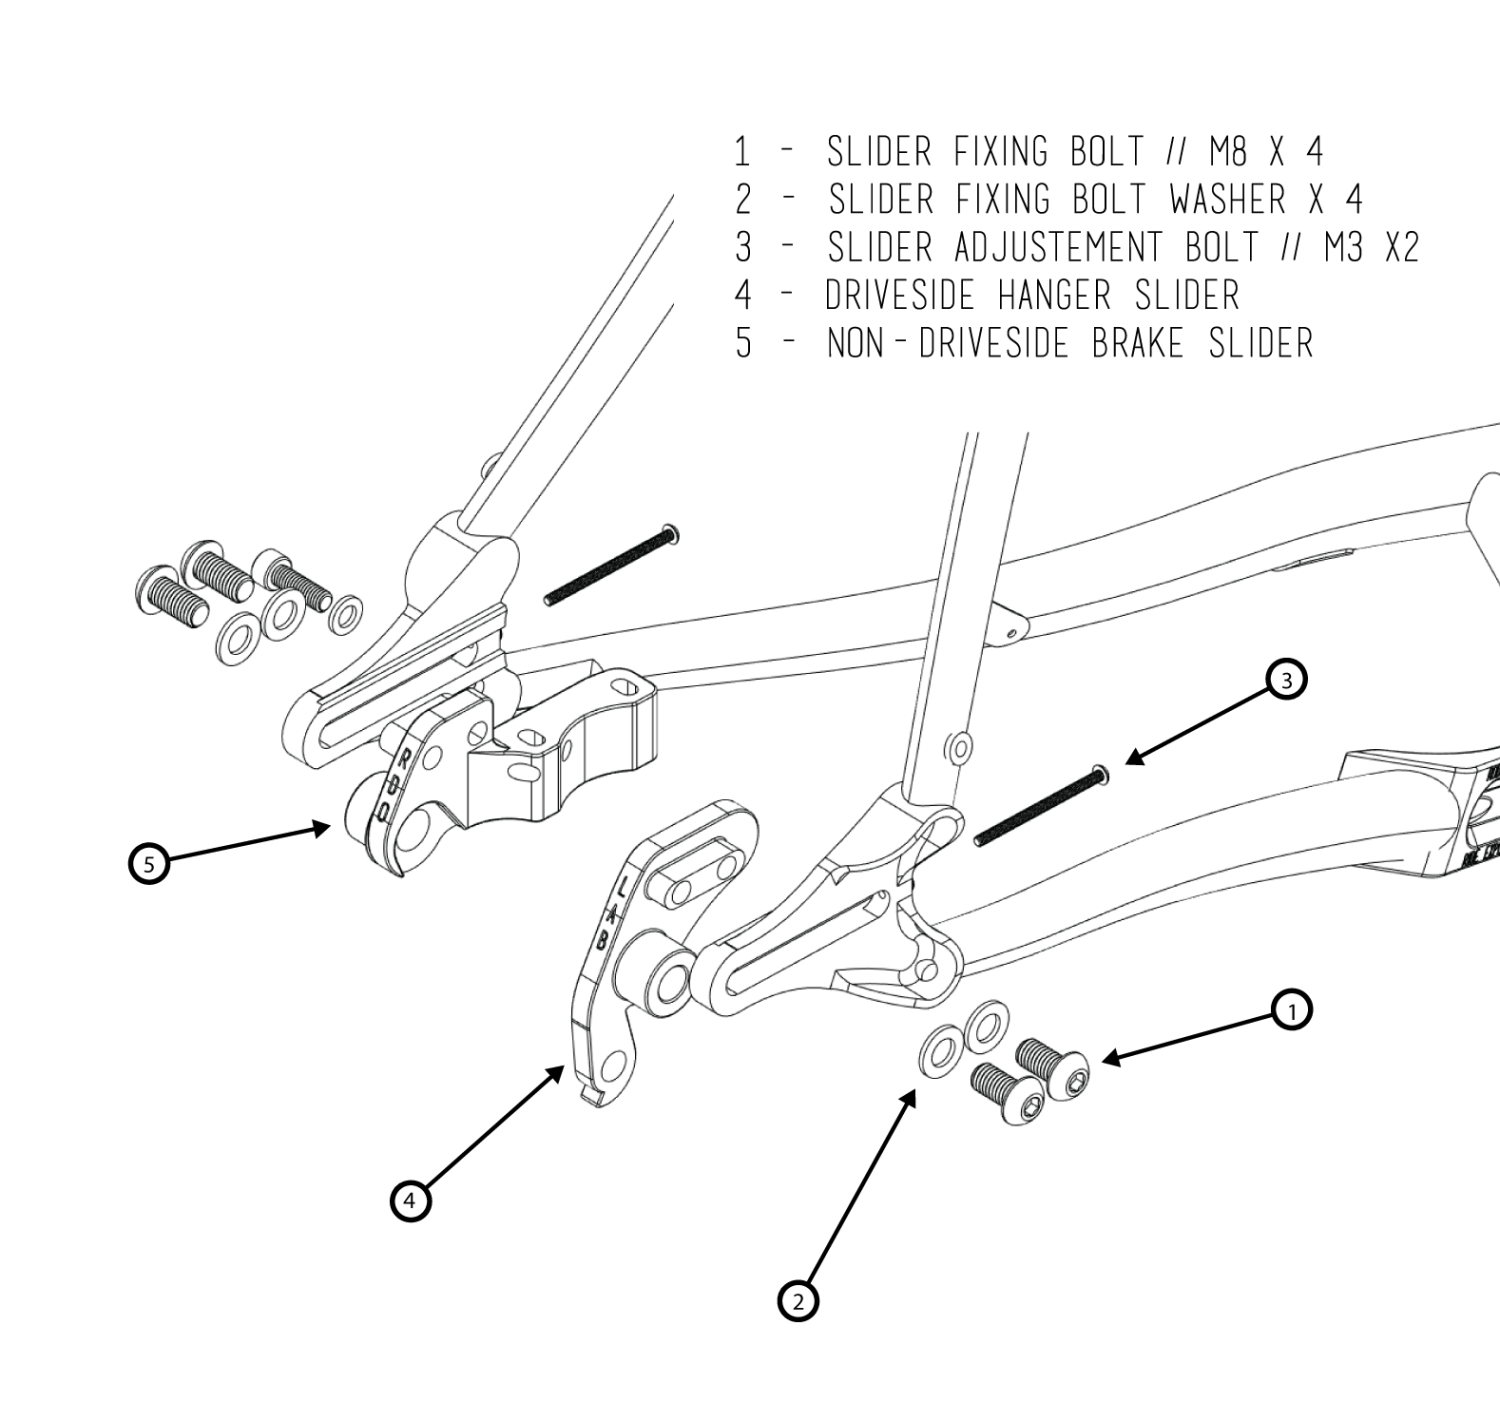
Driveside Slider Dropout Exploded View
Initial Install:
- If building up the frame yourself, we’d highly recommend building the bike with the sliders at the rearmost position. This ensures that your brake line is long enough to accommodate all wheel positions.
- The slider set should always be used in conjunction with the adjustment set screws. This allows fine tuning of the position of your wheel, but also safeguards to a degree against wheel slippage in the rare event that your slider bolts loosen.
- All slider screws and set screws should be used with a hearty amount of grease. The large M8 bolts should be torqued to 15Nm. The smaller M6 should be set to 6 to 8Nm. The slider set screws to not require any particular torque, they should simply contact the slider.
- To move the position of your wheel, all slider bolts should be loosened, including the smaller bolt by the brake mount, and the set screws should be backed out to allow movement. It will usually require a good slap on the tire to get the system to free up. Move the wheel forward or back to your desired position and lock in one of the sliders. Then, using the set screw, fine tune the still loose slider until your wheel is centered relative to the seattube and chainstays. Ensure you have ample tire clearance, and spin the wheel to ensure the wheel is not out of true or a wobbly tire bead will not cause tread contact.
- Of note: When the sliders are set in the full back position towards the rear of the bike, the non driveside slider will contact the rear of the slider channel, but the drive side slider will have an approximately 10mm gap. To adjust the tire for center, tighten the non drive-side first, then center the tire in the frame, using the drive side as the slider that you adjust, then finally tighten the drive side slider when your tire is centered between the chainstays. That’s it, you’re done!
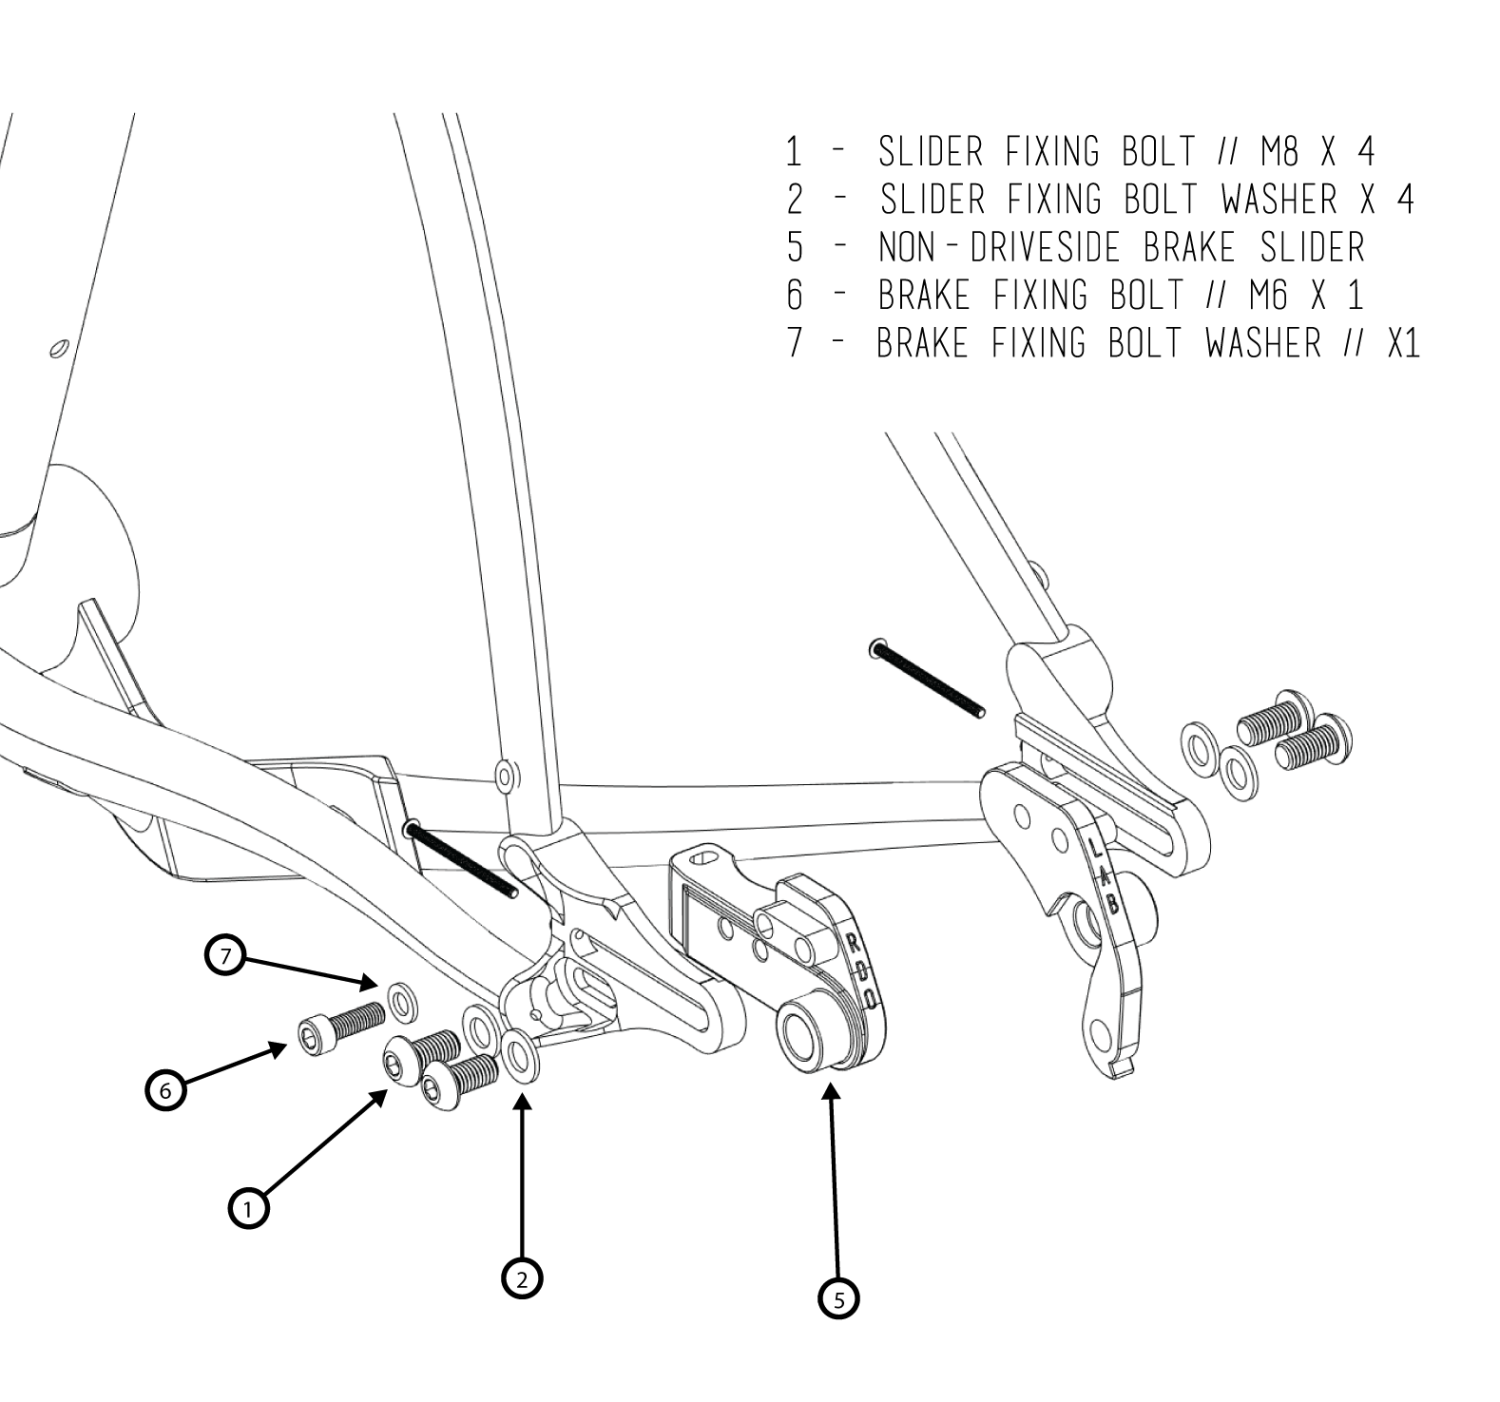
Non-Driveside Slider Exploded View
Singlespeed:
- After building the bike in the rearmost position for minimum necessary brake line length, set the sliders into the middle of the range and lock them in.
- Wrap your chain around the top of the cog and chainring; hold the chain tight and align the loose ends to themselves.
- Typically, while adjusting chain length for singlespeed you will have to decide if you want to cut your chain a tad bit long, or a tad bit short. Things to consider here are if you want bigger or smaller cogs/chainrings in the future. If you think you may change in the future to a bigger cog or chainring, cut the chain on the longer side. If you think you may change in the future to a smaller cog or chainring, cut the chain on the shorter side. Doing this takes advantage of the sliders, allowing you to use the same chain, without cutting it, with alternative tooth counts.
- After deciding on a cut, link the chain together and move the sliders forward or back to accommodate the length. Keep the tire centered during this process; it is easy to forget about it whilst focusing on the chain tension.
- Chain tension is a bit of an art, but a simple one. It should be tight enough to not slip over the cog/chainring, but not so tight that you feel or hear drag/binding in the system. If you feel drivetrain drag from a tight chain, you know that you need to move the sliders foreward a little bit in order to introduce a bit more slack into the chain.
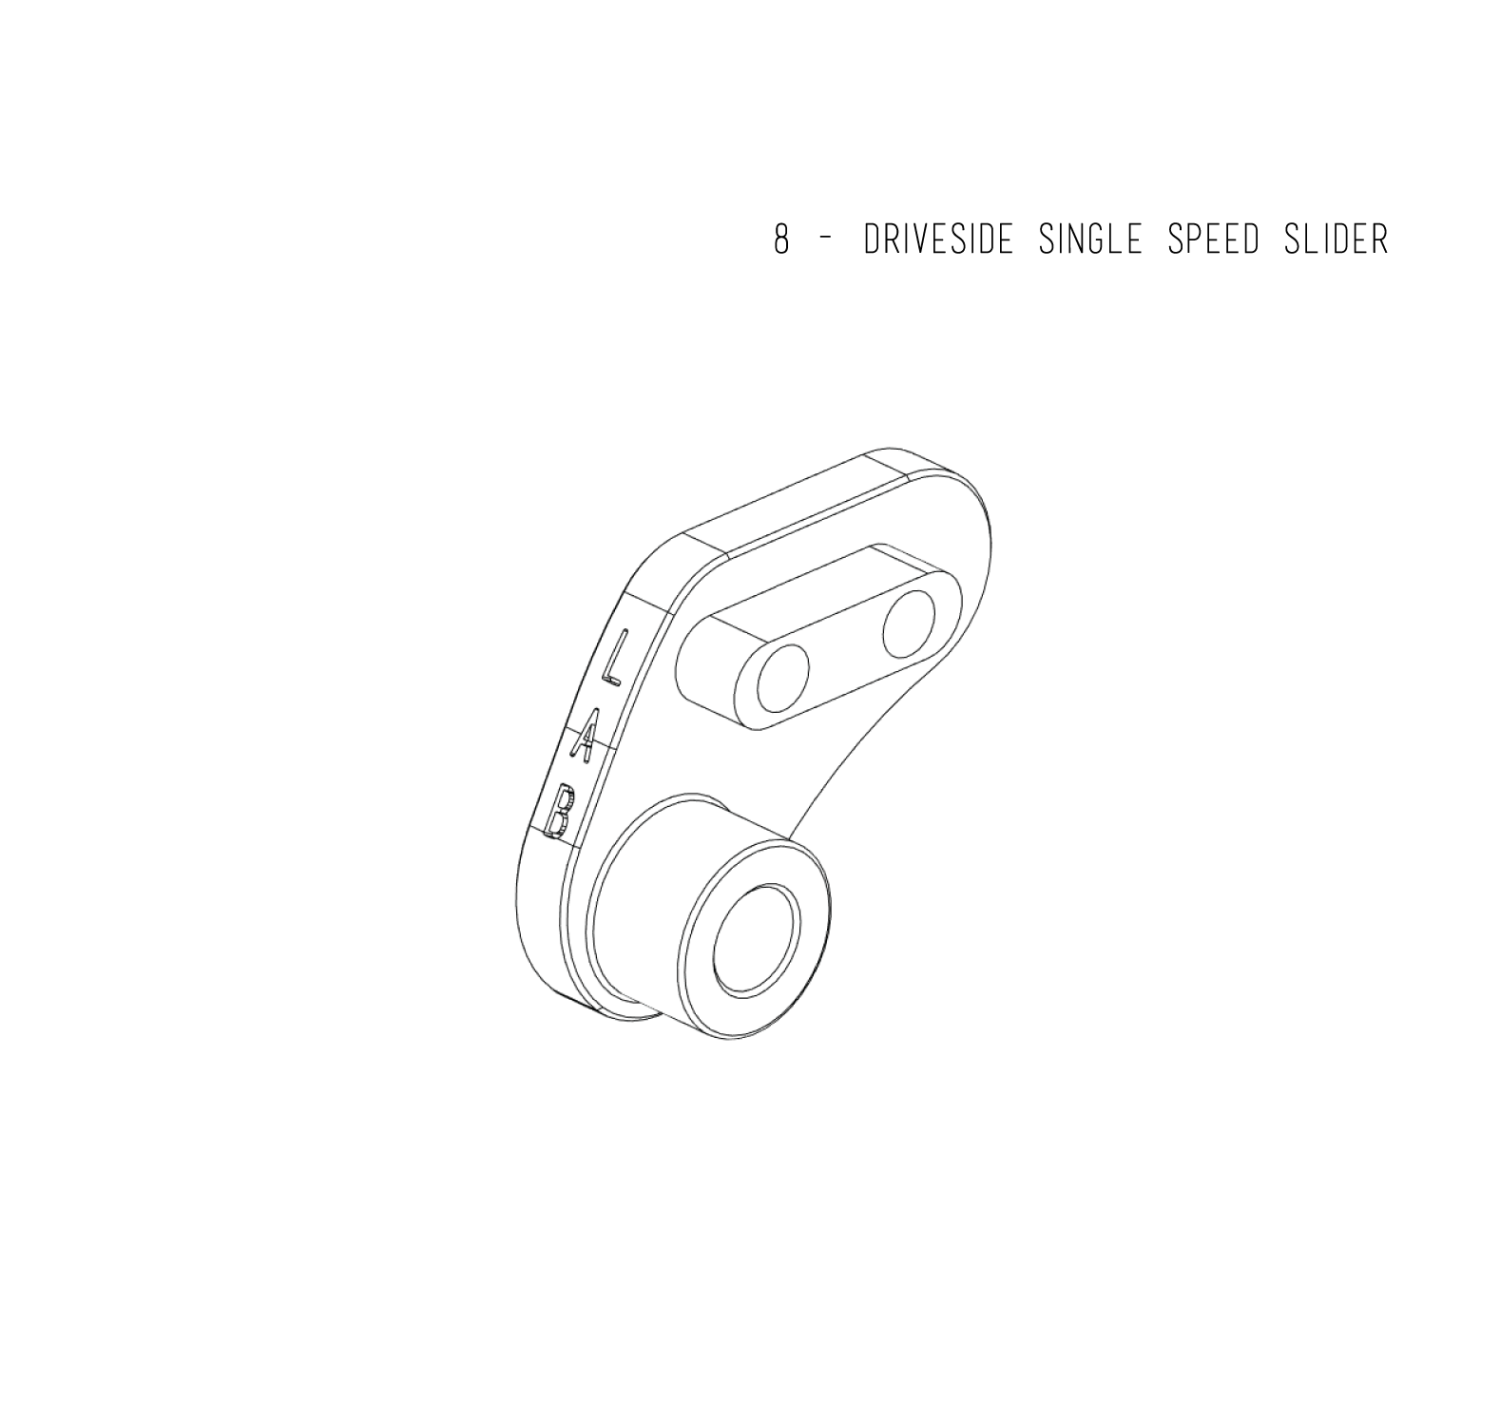
Alternative Sliders:
- Relevant to the above section, we sell a hanger-less driveside slider for singlespeed setups to eliminate that bush-snagging, lonely-looking, grams-adding bit of extra metal from your setup.
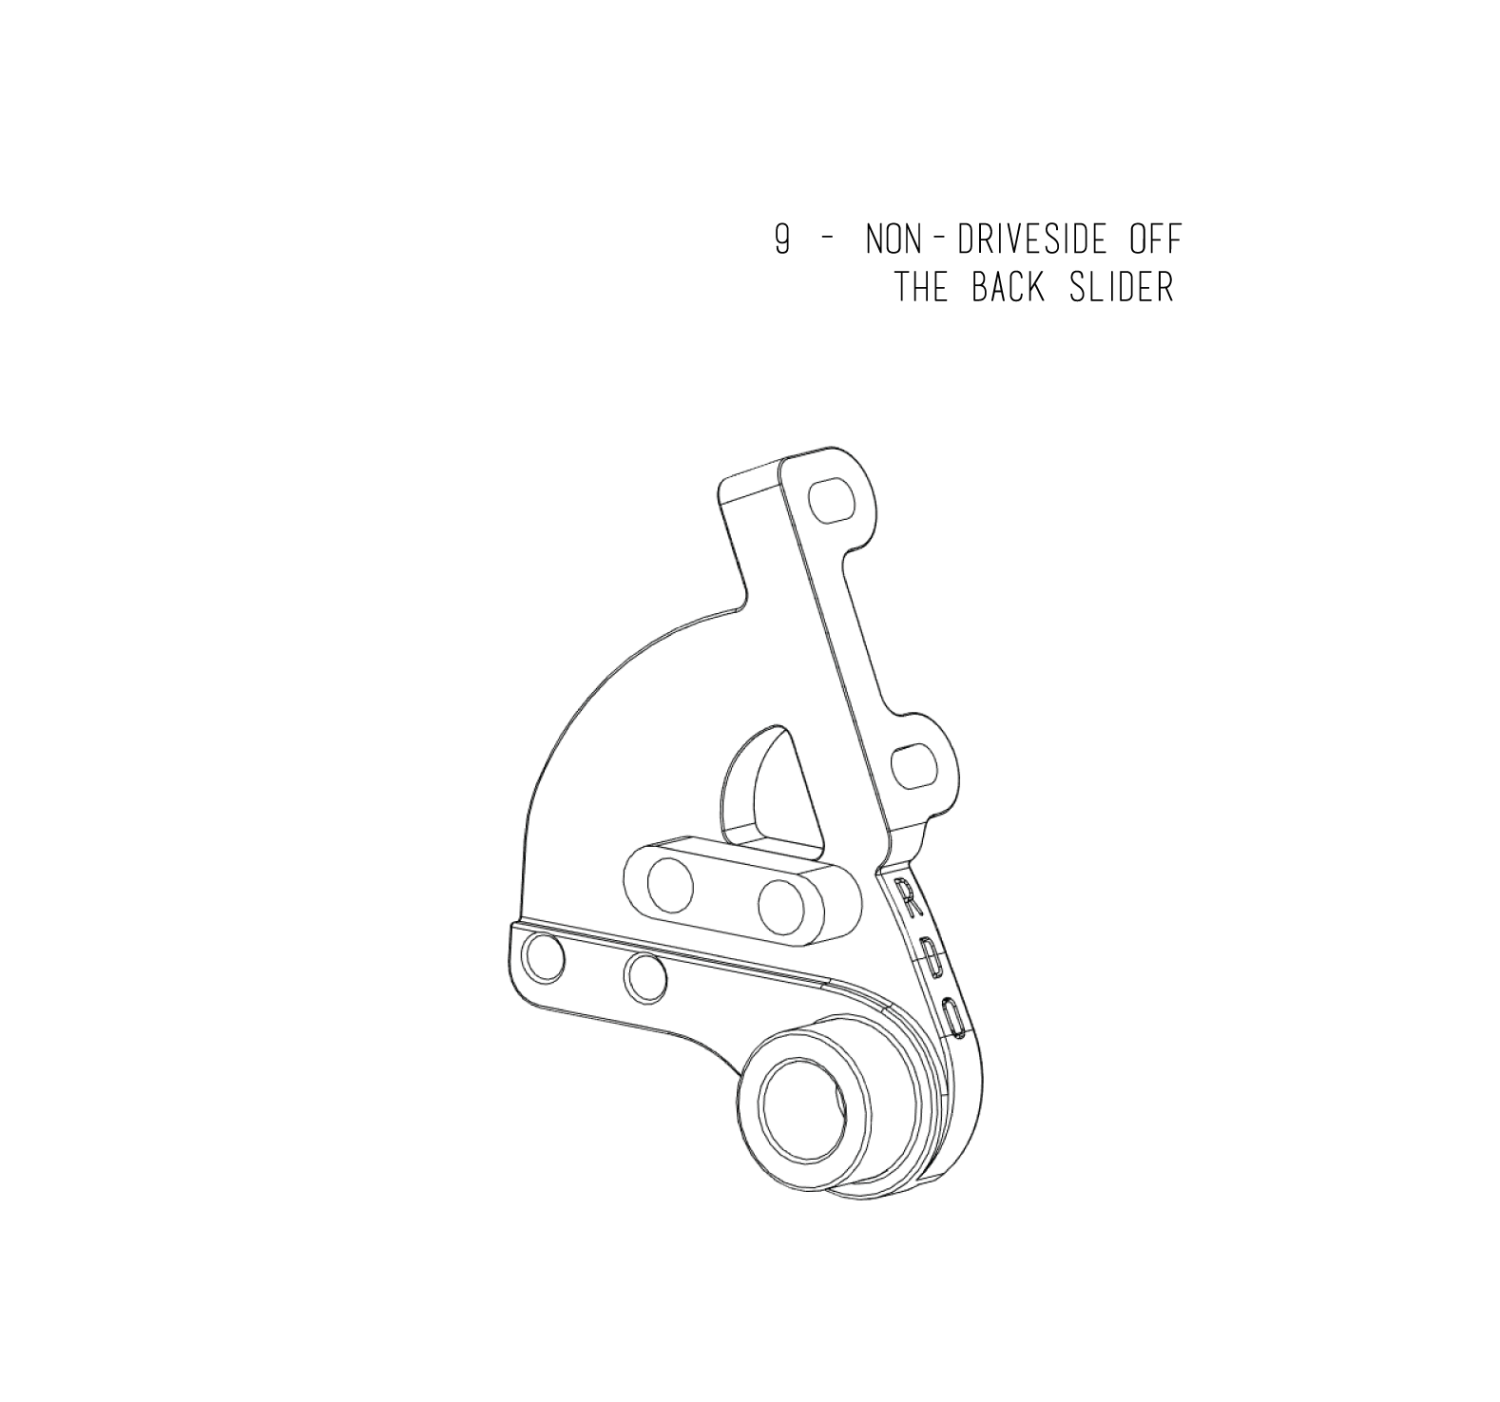
- Are you hitting your frame with a mechanical brake caliper? We thought so. Our standard slider easily fits common “industry standard” calipers from Shimano, TRP, and Sram, but other smaller brands often go off menu and design larger calipers that will interfere with our frame. So we made an alternative slider that moves the caliper behind the seatstay called the “Off-the-back”, or large caliper slider. If you’re running calipers like PAUL, Hope 4 piston, TRP Spyre, some Rotor, Yokozuna, or other similar brands, you’re going to need the alternate slider. Of note, the Off-the-back slider currently only works with our standard derailleur hanger slider, not the Sram T-Type slider because the Sram T-Type changed the axle vertical axis. We may make a compatible slider for that later…
- Running a Rohloff, Shimano Alfine, or just a QR hub? We sell a set of sliders to accommodate your rugged zaniness! We recommend running a DT Swiss RWS Rear Skewer with these because it allows some serious torque to keep those larger hubs where they need to be, and it is nice and easy to move the lever where you need it.
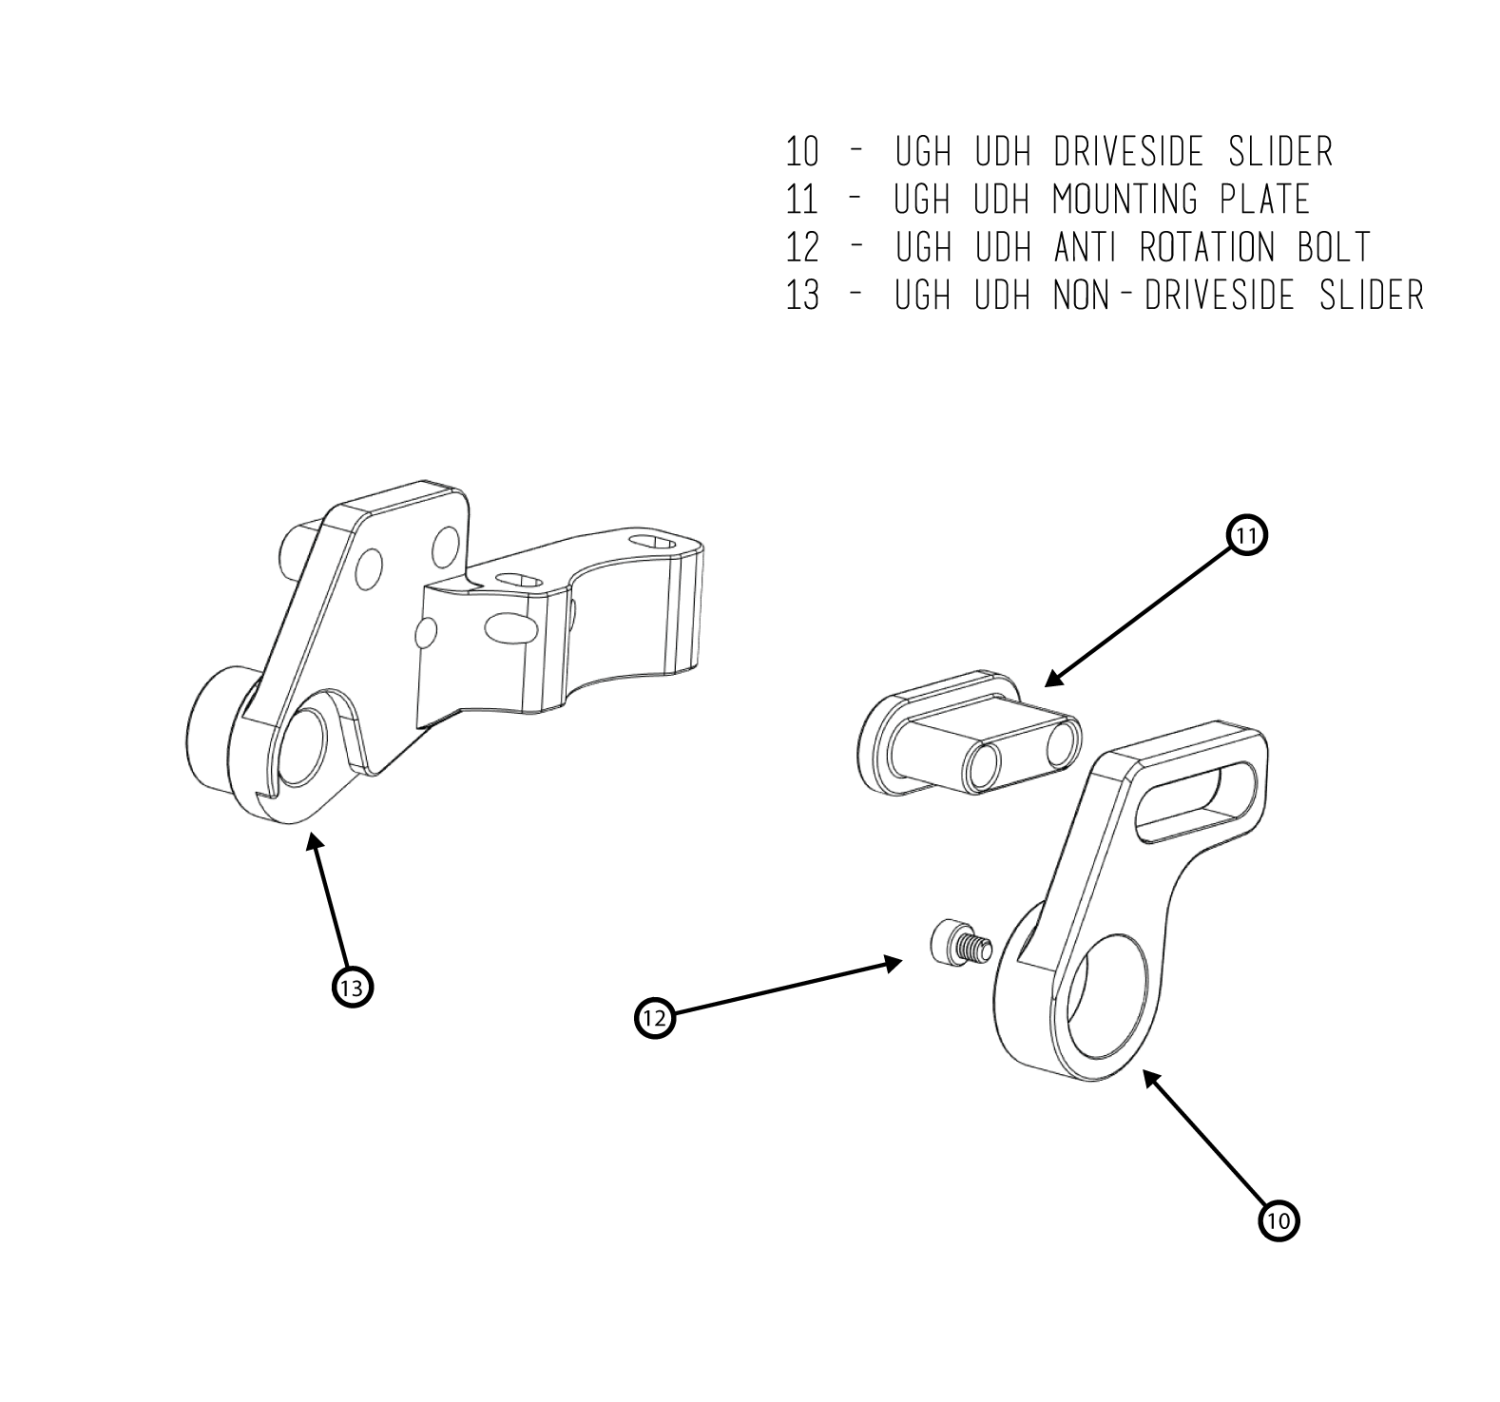
- Got a hankerin’ for the snazzy new SRAM Transmission, but love that sliding dropout and classic round tube look? You’re in luck, the Flaanimal can have the UGH Slider set mounted to accommodate your direct mount shifting needs. WOW, that’s smooth! It can also be used to mount a UDH Hanger onto it to swap your replacement part to a more universal part carried across the world in bike shops. Keep in mind, this set only functions with the brakeside, driveside, and axle, all shipped and assembled as a unit in order to adhere to the requirements of the Transmission spec.
UGH UDH System Exploded View
Frame Care:
- All frame related bolts should be greased. ALL THE BOLTS.
- While our frame is ED coated for corrosion resistance, or many times Cerakoted, that does not mean it is totally impervious to rust. If the coating is removed or worn off, that leaves the steel vulnerable to rust and should be protected.
- If you live in wet or marine environments, we would advise coating the interior of the frame, especially surrounding the BB junction, with Frame Saver spray. That small extra step in prevention can very much help keep rust at bay. That said, marine environments are insidious when it comes to salty air and corrosion, so try to keep the bike dry between uses, and periodically inspect and re-apply frame saver if needed.
- A common area across all bikes for rust problems is its lowest point for water and dirt collection: the bottom bracket area. While we do have drain holes, they can get clogged, and not all water and dirt may get ejected even if it’s not clogged. Periodically maintain and clean your bottom bracket area, including the entries of the seattube, downtube, and chainstays leading into it; the most opportune time for this being during crank and bb maintenance.
- Often small dings in the tubing are nothing to be alarmed about. But size, location, depth, and shape are all factors in determining the safety status of frame damage. If you are not certain if a frame ding is safe, just email us at let-er-buck@rodeo-labs.com
- Seatposts should be installed using carbon grip paste; our seattube is in fact lined with carbon at the clamp area.
Tire Clearance:
What a hot topic. The first thing that should be said is that while we state a max tire clearance number (29 x 2.1 or 27.5 x 2.4), that is not guaranteed for a number of reasons, including: rim width, tire sidewall construction, mud conditions, and tread. Examples of large tires we’ve run on our rims with no issues on trued and dished wheels include:
-
29”
- Maxxis Ikon 2.1
- Maxxis Pace 2.1
- Vittoria Mezcal 2.1
- Panaracer Gravel King (all types) 50c
- Maxxis Rambler 50c
- Maxxis Ravager 50c
- Pirelli Cinturato 50c
- WTB Nano 2.1
- Schwalbe G-One Bite 50c
- Schwalbe Thunder Burt 2.1
- Vittoria Barzo 2.1
- Vittoria Terreno Dry 54c
- WTB Venture 50c
- 45NRTH Gravdahl 45c Studded
- WTB Nineline 2.25
-
27.5”
-
- Maxxis Ardent and Ardent Race 27.5×2.4
- Maxxis Ikon 2.35
- Maxxis Rekon and Rekon Race 2.35
- Vittoria Mezcal 2.35
- Maxxis Crossmark 2.2
- Pirelli Scorpion 2.4
- Teravail Ehline 2.3
- Panaracer GravelKing (all types) 54c
If you’re worried about tire rubbing, please do size down! A little restraint goes a long way towards preserving the finish of your frame.
Frame and Fork Specs:
- Headset:
- ZS44/28.6 Upper
- EC44/40 Lower
- Bottom Bracket:
- 85.5 T47 Inboard Bearing Cup
- Not intended for mountain crank spindles, proper bearing landing not guaranteed.
- Seatpost: 27.2mm
- Seatpost Clamp: 35mm. 31.8mm for Titanium.
- Brakes: Flat mount front and rear. 140mm Rotor Standard, 160mm available via adapter.
- Do not exceed 160mm rotors on front fork; thread inserts only rated for 160mm of braking torque.
- Brake Caliper Bolts:
- Front M5x15mm.
- Rear M5x20mm.
- Please use blue Loctite.
- Dropouts:
- Front: 12x100mm standard. Can swap to 15x100mm.
- Rear: 12x142mm standard. Can swap to 135mm QR.
- Axles:
- Front: 12x127mm or 15x127mm, 1.5mm Pitch, 16mm Thread Length
- Rear: 12x172mm, 1.5mm Pitch, 16mm Thread Length
- UDH Rear: 12x175mm, 1.0 Pitch, 14.5mm Thread Length
- Chainring Clearance:
- 1x – 46t max, 30t min
- 2x – 50/34 max, 36/24 min
- Singlespeed minimum chainring (to avoid chain hitting yoke) 40t round/42t oval.
- Slider Bolts:
- M8x15mm Stainless (15Nm Torque), “third” brake slider bolt M6x15mm (6-8Nm)
- Set screws: M3x45 (no “torque”, only light friction from contact)
- Set screws for Titanium: M5x45
- Front Derailleurs: Custom Braze-On FD Clamp available upon request. 31.8mm diameter.
- Rear Fenders: Fender bridge available upon request. 65mm max.
- Front Fenders: Extended dropout eyelet kit available upon request. 65mm max.
- Max headset spacer stack under stem: 40mm
- Fork Crown Thru Bolt: 85mm minimum. Stainless steel recommended, nylon nut recommended. Use washers on both sides of the carbon fork crown.
- Fork leg cargo weight limit: 13 lbs per side. Bolts must go all the way through threads, warranty void otherwise. Minimum bolt thread length 20mm, set provided.
- Rider weight limit: 250lbs