
 Congrats on adopting a Traildonkey, and thanks for the support for what we are building!
We will be compiling ongoing technical and general ownership notes on this page and will update it on an ongoing basis. If you don’t see a topic covered that you need assistance with just get in touch and we’ll get you dialed.
A Note On Trail Riding on a Trail Donkey:
As you may have seen, we ride our Traildonkey on trails constantly. We’ve even won a mountain bike race on it. Traildonkey is designed as a trail bike, but it is NOT the same as a mountain bike. Trail riding on a Traildonkey is a more nuanced discipline than standard MTB trail riding. Traildonkey does not give you super powers that defy the laws of trail physics.
On a standard MTB the larger tires and suspension absorb much of the trail surface and rocks. On a Traildonkey you have no such aids. Your only insulation between the trail is your arms, legs, and tires. For the best trial riding experience a 42mm 700c tire such as the WTB Resolute is a great choice. The more air volume your tires can hold the more suspension they provide AND the lower pressure you can run. Please do experiment with tire pressure. We’ve found that even a 175lb rider can run pressures in the mid 20s while trail riding and it greatly enhances the overall experience. If you run 50psi out on the trails you will get pretty beat up by the terrain and you aren’t taking advantage of large volume tires.
Trail riding on a Donkey requires finesse. You don’t plow through rocks and roots, you thread a line through them and you finesse the bike over them by weighting and unweighting the tires in alternating fashion. This is a very rewarding skill gained through experience, but it takes practice. Solving a technical trail can be like solving a puzzle and the satisfaction gained is truly worth it.
We regularly take the Traildonkey insane places in search of fun and adventure, and we regularly encounter conditions where the bike is outclassed. You wouldn’t want to take big drops on the Traildonkey. You wouldn’t want to ride through a boulder field. Sometimes you just have to get off and walk a particularly “big” section of trail, but the remaining sections of trail AND the ride to/from the trail are all a part of the Traildonkey experience.
You won’t set speed records on most trails on a Traildonkey. On any given trail you’ll probably ride slower than a pure mountain bike. It is important to keep an eye on your speed and leave a margin of error for safety. If you are blasting along on a trail and encounter a huge rock the Donkey doesn’t have shocks that will save you, so leave enough time to react to and avoid trail obstacles that are too big to safely navigate.
If you spend most of your time on trails vs roads, gravel roads, or cx races, you may have want to tune your build with a supsension seatpost or dropper seatpost which will soften the ride and add quite a bit of maneuverability to the bike in technical situations. Traildonkey has internal dropper post routing points on the frame for just such reasons.
We hope you have a ton of fun and adventure on your bike. We hope you take it ambitious places. We hope it challenges you to imagine new routes that you previously wouldn’t have considered. We hope it causes you to grow as a rider and experience new things in the process.
Rodeo Labs
Housing Stops:
Housing stops should be removed while threading cable and brake housing and re-installed after the housing is roughly in position. This will keep the sharp edges of the housing stops from scratching the housing as it is adjusted fore/aft in the frame.
Cable routing:
If you’ve purchased your Traildonkey as a frameset or unbuilt bike it will come with black plastic tubing threaded through the cable routing ports of the frame. Those are inserted at the factory to aid in properly and easily routing your cables and housing.
The following steps should be followed:
Rear Derailleur:
- Thread an EXTRA (cheap, non-teflon-coated) derailleur cable through the black tube from the front of the frame and out the back of the frame. The cable should have both ends clipped clean so that you can thread housing over it from either end. If the cable becomes frayed clip it clean again or discard if it becomes too short for the desired housing run.
- Hold the derailleur cable tight at the front of the frame and pull the black plastic guide housing completely out of the frame from the back of the frame. This will leave ONLY the derailleur guide cable left in the frame with the small end of the cable dangling out of the back exit of the frameset.
- Starting at the back of the frame thread your derailleur housing over the inserted cable. The cable should slide fairly smoothly along the inner cable as you thread it.
- Remove the bottom bracket cover under the bottom bracket to access cables and housing as they wrap around the bottom bracket area.
- Once you’ve got the housing through the chain stay and through the hole in the bottom bracket area pull some extra housing and slack before exiting the BB area through the exit hole. It is easier to feed the remaining length to the front exit of the frame if you have a bit of slack to work with.
- You may need to finesse the housing as you navigate through the bottom bracket area, but the derailleur cable will guide the housing through the area. An extra spoke is sometimes helpful for fishing the end of the housing or finessing it through the tight openings in the BB area.
- Remove the aluminum cable guide hardware at the front exit of the frame and THEN feed the housing through the front exit of the frame. Once you’ve pulled the necessary length of housing through the front of the frame you can put this back into place, but removing it prevents the edges of the aluminum hardware from scraping the housing. It is a good idea to loctite those guide cap bolts into place so that they do not rattle loose.
- Congrats! You’ve threaded the derailleur housing through the frame. You can now remove the guide cable from the housing.
- If you change out the housing in the future you MUST thread a cable back into the housing and through the frame before removing the housing so that you have a guide for re-inserting new housing. If you don’t do this it will be much much more difficult to re-thread new housing.
Front Derailleur:
- If using a front derailleur the housing is capped where it enters the frame and the raw cable is threaded internally in the frame. It is fairly simply to thread the raw cable down to the bottom bracket area and around the cable guide in the bottom bracket before exiting the small exit hole behind the BB twards the front derailleur mount.
Rear Brake:
- The rear brake procedure is very similar to the rear derailleur housing except that it must be threaded from front to back when using hydraulic brakes. Hydraulic brakes use non-replaceable crimp banjo fittings where they mate to the lever, so the only end that can be threaded over a guide (derailleur) cable is the end that attaches to the caliper.
- Important: See manufacturer’s installation instructions before attempting a re-install of a hydro caliper.The process is complex and prone to error. It is worth having a bike shop perform the installation and bleed of the caliper /
- If your hydro calipers come as a complete closed caliper, housing, lever system with oil installed you will need to cut the housing right before it enters the rear caliper in order to use the guide cable method of housing installation. You will also need to pump the lever as to flush hydraulic oil from the line as much as possible.
- Important: Hydraulic brake fluid can be VERY caustic and strip the paint and finishes from your frame if spilled. If you do spill, don’t panic, but do clean quickly with isopropyl alchol.
- When threading the rear brake housing through the bottom bracket it can be a bit tricky to pass through the small hole between the down tube and bottom bracket area. Persistence and elbow grease go a long way. If you are having difficulty, just shoot us a note to discuss.
– Application: for 15 mm frame diameter
– Bolt Length: 28 mm
– Factory Number: Y-8N208050
Spork routing:
- Spork internal hydraulic housing uses a similar method as the frame to route, but the length is much shorter and it is a fair bit easier so we do not pre-thread a guide in the fork.
- Simply thread a guide cable into the top housing port on the fork and finesse it through the lower port. It can be helpful to give the end of the guide cable a subtle, shallow bend so that it curves and exits the lower exit point easily.
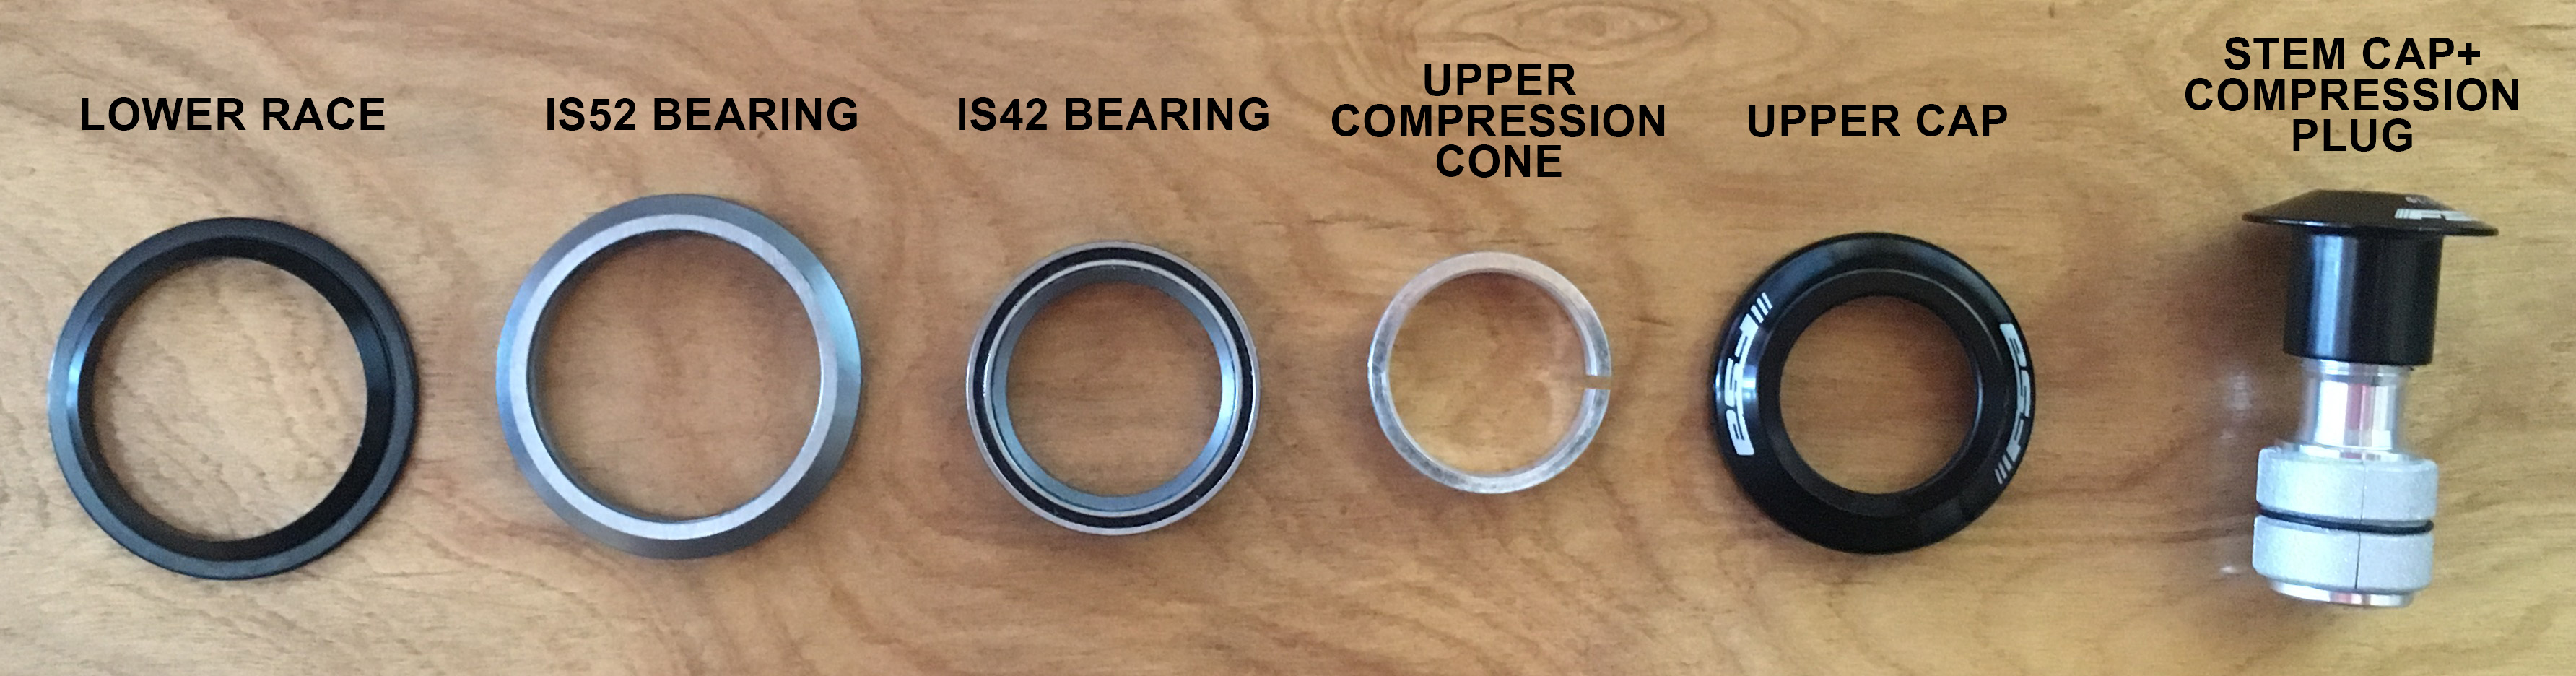
Headset:
Traildonkey has bearing cups molded into the frame and uses an IS42 uppear bearing with an IS52 lower bearing.
Diagram: http://fsa-4207.kxcdn.com/wp-content/uploads/2016/08/NO.42_52_ACB.pdf
The compression plug device must NOT be a star nut. Star nuts damage carbon steer tubes.
The Steer tube is a tapered 1 1/8″ to 1.5″.
The lower bearing race that we use on our builds is notched (the race has a cut in it) so that it can expand slightly as it fits into place on the steer tube. Non-notched lower bearing races can be used but may not sit as flush on the fork crown.
Compatible headsets are made by:
- FSA
- Ritchey (Comp and WCS)
- Cane Creek (40 series and 110 series).
 Axles:
When your bike arrives there will be a hang tag with axle instructions on it. Be sure to read these instructions and familiarize yourself with proper axle use.
Of note: Over tightening your axles will shorten their service live by stripping the cam. Your axle lever should close tight and feel snug, but if you have trouble prying it open you’ve over tightened it. Don’t do that!
We source our own axles and while the diameter and length are universal, there is hardly a universal thread pitch.
Some reading:
http://bikeandskiblog.com/wp/2016/01/12/mtb-thru-axles-who-knew-there-were-so-many-standards/
Our axles follow these specifications:
Thru axle for frame: φ12xP1.5x170L(with thread) (1.5 is the thread pitch)
Thru axle for fork: φ15xM14xP1.5x130L(with thread) (1.5 is the thread pitch)
There are replacement axle options DT Swiss and Carbon Ti, and there may be others.
Wheels
IMPORTANT: Do not over-inflate a large diameter tire. Follow manufacturer’s inflation guidelines. If you over-inflate a tire it will be dangerous and may cause the tire to deform. We’ve seen this with many WTB off road tires which are not designed for high PSI. People sometimes inflate them to road pressures and it ruins the tire. Large volume tires DO NOT need high PSI.
1. Your rims have an elevated bead profile near the hooks of the rim. This is called a bead lock and creates a very secure, very airtight seal between the tire bead and the rim. It allows the tires to be run into the low 20psi range without burping. The circumference of the inner rim is larger in the bead lock channel than it is in the middle channel of the rim. When you are mounting or dismounting tires be sure to push both tire beads towards the inner middle channel of the rim so that the tire bead has some slack in it. It is almost completely impossible to mount or unmount a tire when the bead is snapped into place up on the elevated bead lock.
2. When inflating the tire it takes some decent PSI to force the tire out of the center channel and into the bead lock. You will hear loud pops as the tire settles into place. For a 40-ish mm mixed terrain tire inflate tire to the 60-70 PSI range to make sure that the tire has fully snapped into place (you will hear a popping sound when it does) then deflate down towards the 40psi range for mixed road/trail riding and even down to 20-25psi for full trail riding. Naturally your weight is a factor here. Heavier riders shouldn’t be rolling around at 20psi, but at 177lbs and we’ve done quite a bit of riding in the 25psi range (this is at 40c we’re talking about here, the bigger the tire the lower the PSI you can run).
3. It takes lubrication for the tires to mount well and slide into place. Sometimes we don’t use any at all and things work fine but generally a little bit of soapy water or even just a good distribution of Stan’s on the surface of the rim will allow the tire to more easily slide into place in the bead lock.
4. When first putting the tire onto the rim put the rim fully inside of the “U” of the loose, unmounted tire THEN push both beads on from the outside of the rim. This is by far the easiest way to mount a tubeless tire because the bead only has to be pushed over the rim once. If you start with the tire on the outside of one side of the rim and push both beads over the same side of the rim you will have a much more difficult mounting experience.
5. Start mounting the tire bead by the valve hole and make sure that both beads sit between the valve stem and the rim. Sometimes they get caught sitting up on the valve stem or they both get caught on the same side of the valve stem. This will make inflating possible.
6. If you ever have trouble getting a tire to take air just take the valve core out, inflate the tire until the beads “pop” into place, then allow the tire to deflate, put the valve core back in, and reinflate. If the tire beads have snapped into place the tire will be very easy to reinflate. Removing the valve core allows more air to enter the tire more quickly, ensuring adequate PSI to force the tire into place on the rim.