

Words by Stephen Fitzgerald
After months of prep and a whole lot of hush hush, I’m excited to finally spill the beans and offer a full breakdown on the Traildonkey 3.0 that I’ve built up to race next week at Atlas Mountain Race in Morocco. This bike is a lot of things to me. It has layers like an onion. So to simply put up the photos and list some gear would be to short sell the effort and consideration that it took to bring this build into existence.
As a bit of backstory I should fully confess to everyone reading that I’ve never gone bikepacking before. Atlas Mountain Race will be my first outing. While it will be mind bogglingly difficult for me to do this race this actually qualifies more as a baby bikepacking race compared to bigger races such as Tour Divide or Silk Road Mountain Race. I don’t “know” how to build and outfit and build a proper bikepacking bike. I’m going to list out the build components and talk about the makeup of the bike, but while doing that I’m going to roll in a Thank You list of people that helped make this bike possible.

Greg Besaw – This bike would never have come together without his help. Greg is a Denver local and a member of our Donkey test squad. He’s a badass and he bikepacks like nobody I know. When I told Greg I was going to Morocco he immediately came by with three massive plastic bins full of exotic bikepacking gear and took me through each bag and part step by step. Greg is the sort of dude who has four bikepacking tents, three pillows, and eleventy-nine different frame bags. If he like something he keeps it and if he doesn’t it gets sold on to a new home. So Greg gets credit for all of the good choices on this bike, and the bad choices if there are any are where I’ve deviated from his advice. Also in the Thank You column for tech help are Al Meder and Jay Petervary who offered advice based on real world experience which is the only type of advice worth taking when you’re diving into bikepacking.


Jeff and Mark Panaracer – I sent a note to Panaracer asking about Gravel King SK+ tires for Morocco because I trusted those tires more than any other tire. I ran them first at DK in 2019 and then they stayed on my bike for the rest of the year because they worked across such a huge range of conditions. I wanted to run 650b x 2.1″ tires in Morocco but they didn’t exist in Panaracer’s lineup that I knew of. When I asked Jeff about them he said that they were in development and sent me an early batch to try. Jeff and Mark then sent a couple more sets in the more durable “+” variant once those had been produced. The tires themselves will hit the market in March by the way. Based on three weeks of riding on them in January they get a genuine 10/10 vote from me. Atlas Mountain Tace will have every possible surface with which to contend with and I believe that Gravel Kings are the tires most suited for that challenge. I’m relieved that I can feel confident about my tires when I’m a world away from home. I’m also thankful for bike industry brands that don’t HAVE to be nice but chose to be. Panaracer is one of those brands.


Matt at Wahoo – I already run an Element Bolt because it just works and the battery life is good, but when I reached out to Matt about the Roam and looking for EP pricing he said something very cool:
“I want to send you one because you are doing some rad work and I know that you are sharing the love with your local community. Stoked to support your ride in Morroco in any way I can.”
That made my day. I’ve run Wahoo for a while now and I’m extra grateful for their generosity and to have the latest and greatest keeping me on course in the middle of almost-nowhere.

Matt at Exile Designs – Matt makes all of the custom bags for us at Rodeo, but he’s also pretty family at this point. Matt has a lot going on in life in general but he really hustled to get the custom printed and custom fit bags ready for this bike. In addition to the mainstay multi-compartment frame bag and the perfectly fitted top tube bag he created a one-off mini top tube bag for the seatpost area so I could carry just a few more bits and snacks along the way. When I told Matt that I was trying to keep the weight down on the bike wherever possible he modded the already awesome Fannie Packer hip pack / bar bag and added some loops that were useful for making it the main assembly that secures the front tent roll on the bike. Instead of adding a somewhat heavy cradle to the mix I’m not having to carry any additional grams to get the storage and functionality that I need. Cool stuff!


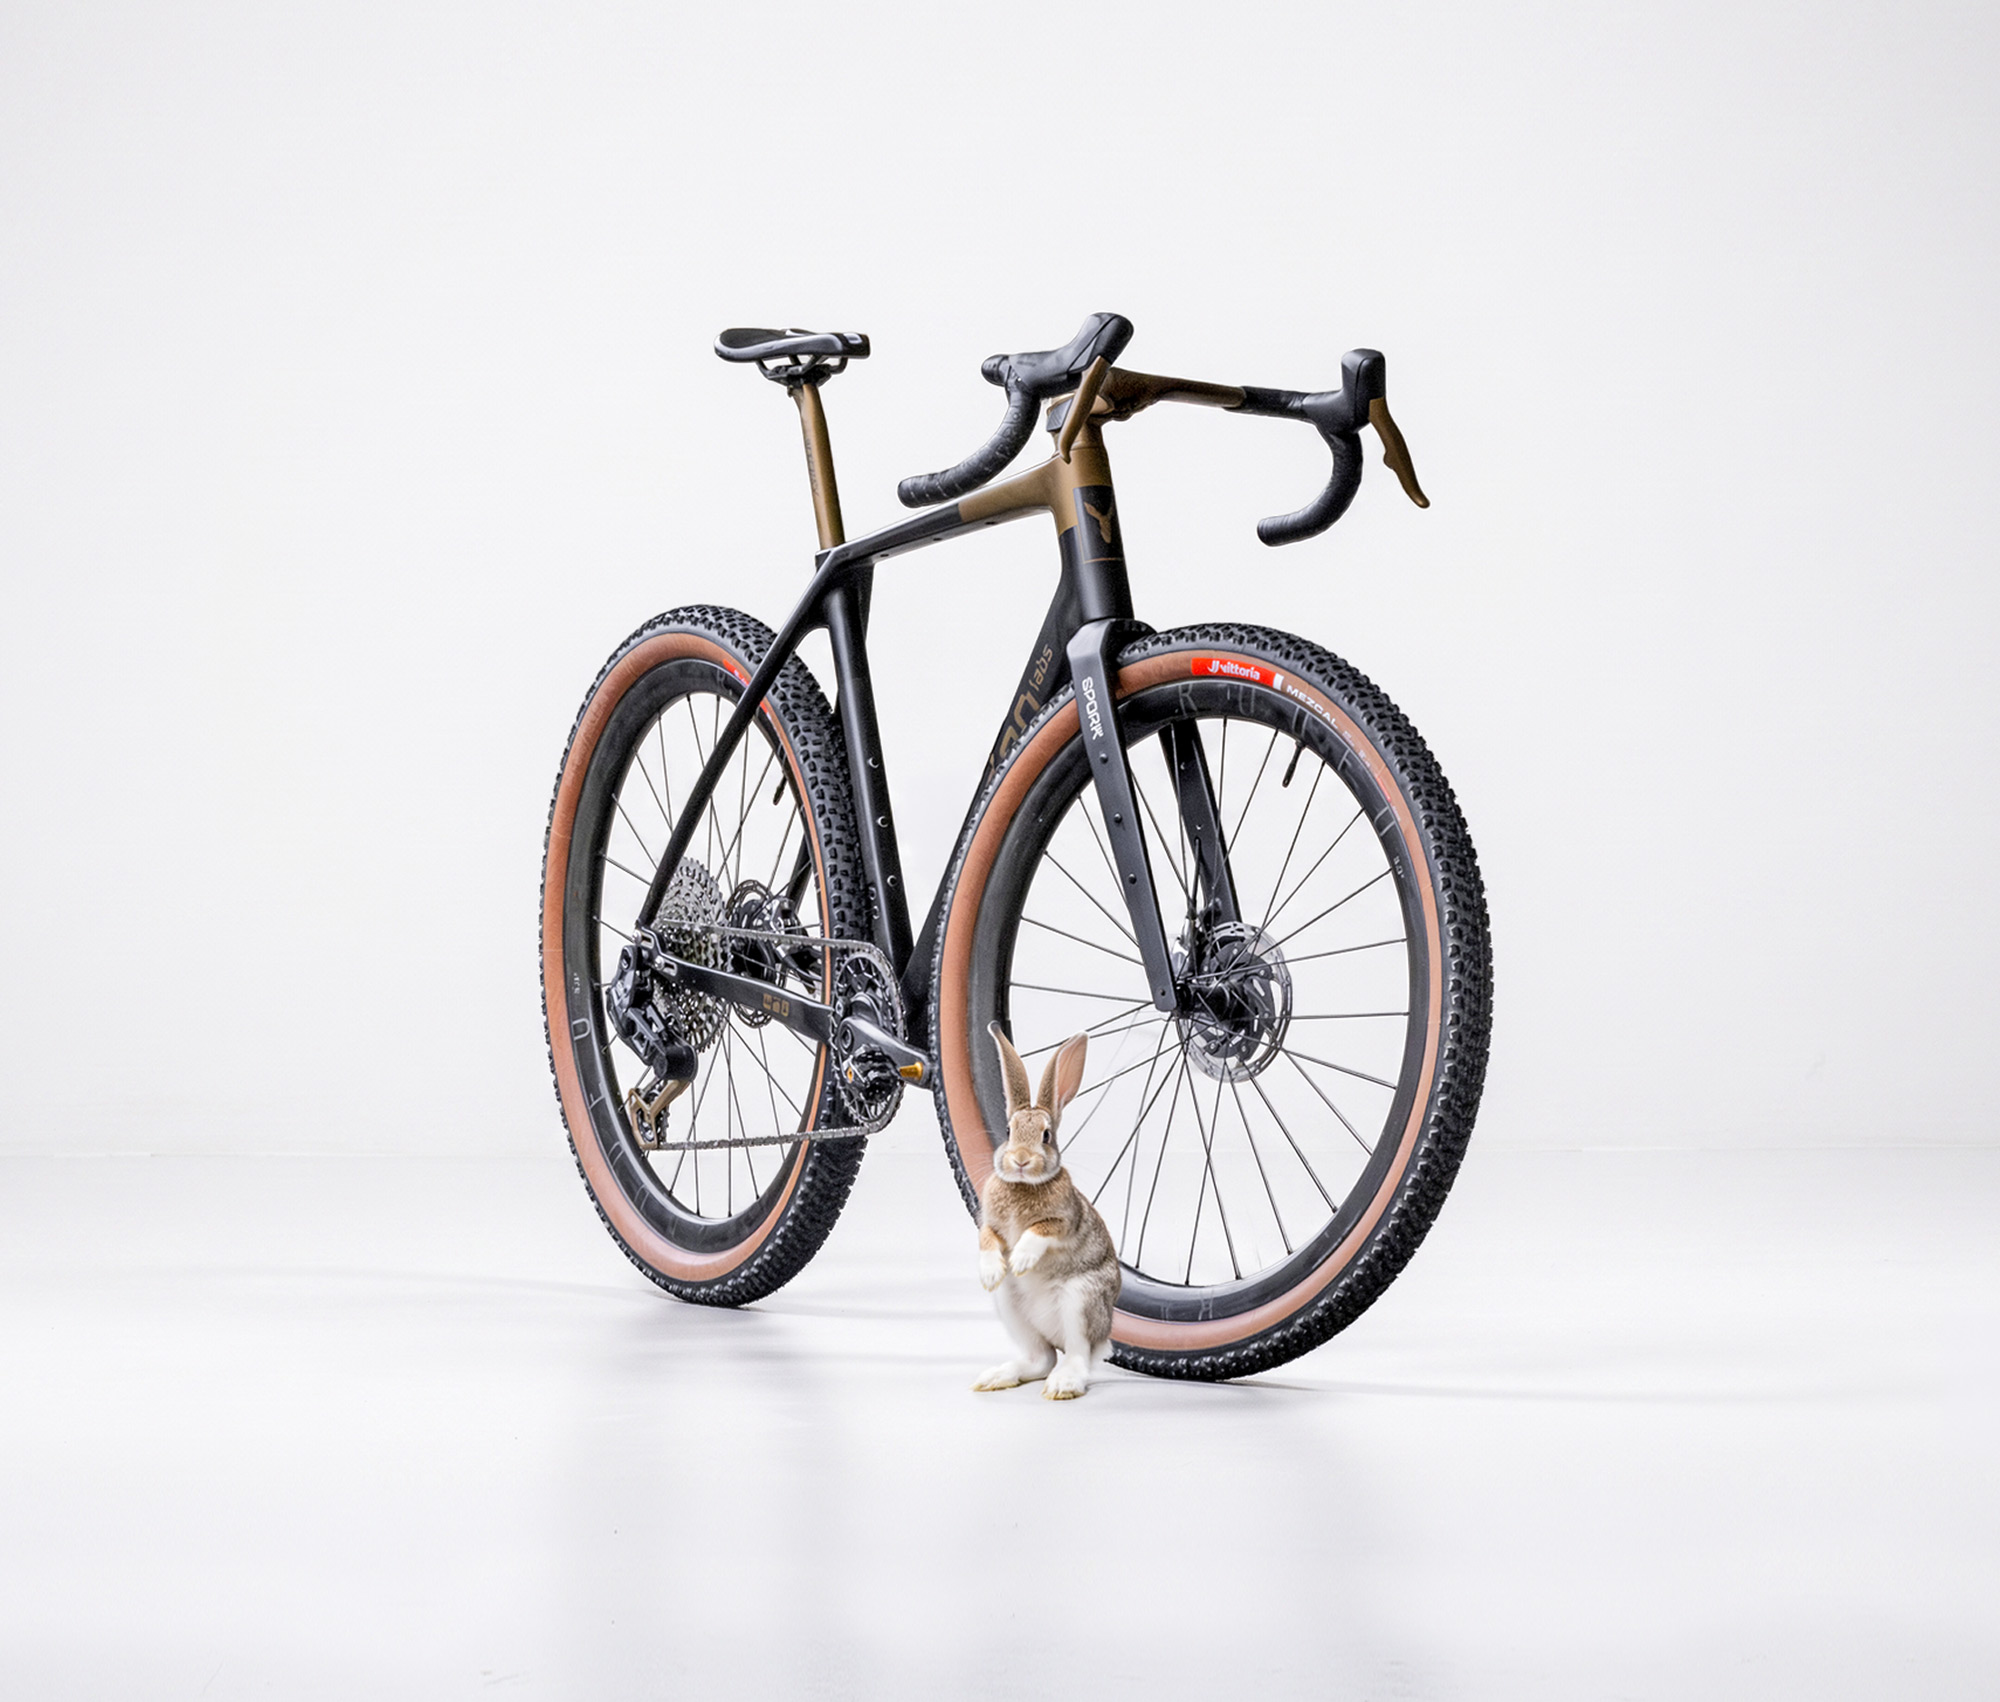
Steve at Magnetic Wheel Co – Steve has built all of our Rodeo wheels since we started this party in 2014. For this build he laced a Shimano 32 hole font dynamo hub to a custom bronze metallic Cerakoted 650b Rodeo carbon rim. I can’t have spokes or rims breaking overseas, and there aren’t any other hands I trust to build my wheels like I do Steve’s.


Mike and Mike at Cerakote – As we covered most recently with Drew’s custom Cerakoted TD3, we’re onboard with Cerakote, a newer, more durable, lighter, and more environmentally responsible bicycle coating technology for 2020 and beyond. This Morocco TD3 is actually the first frameset that we coated with this ceramic-polymer coating and we didn’t stop with the frame and fork, we went a little bit nuts. We also coated the Redshift suspension stem, eeSilk suspension seatpost, TRP Hylex RS brake levers, Sinewave dynamo headlight, and our 650b carbon rims. Previously I wouldn’t have thought about coating so many things with traditional paint because it is thick, heavy, and prone to chipping. Cerakote is the opposite of all of those things and this bike is going to be a great case study of how it protects the bike from 720 miles of abuse as I make my way across Morocco.

Stan at Absolute Black – I like Absolute Black chainrings. I’ve been riding them for a couple of years now. Do they make me faster? I have no idea, but I love the feel of the pedal stroke, the traction, and yes the looks of them. If you are going to put a chainring on your bike it may as well be a really rad one. In previous riding where there was a ton of climbing (such as in Leadville or Silverton) I opted for a 34t front ring. Atlas Mountain Race has a LOT of climbing but I went with a 36t this time because the odds are that I’m going to be doing a fair bit of hike a bike on the steeper gradients with a loaded bike. I decided that a 36t would be useful for not spinning out when the road pointed downwards and some quick cruising was possible.

Sheldon at The Lab – Sheldon builds every single bike at Rodeo Labs. I used to build my own bikes but truth be told I’m a B- mechanic and I needed A+ build quality on this bike. From thoughtful routing to every bolt being at the correct torque spec I know that Sheldon is my best chance of having a reliable steed for this race.

Hilary at PNW Components – As I was considering handlebars to use for this race my first inclination was to stick with what I already knew worked well: My trusty Easton EC70 AX bars. Then after Philly I had been putting a lot of miles on the Flaanimal 5.0 prototype which as Ritchey Venturemax Carbon bars on it. The Venturemax bar is more compliant than the Easton and the wider flare is more confidence inspiring off road. But then came winter and I started spending more time on my flat bar single speed Traildonkey. I noticed that with that bar I had significantly more leverage when climbing and controlling the bike offroad. When I would return to my drop bar bikes the bars felt narrow in comparison. I started wondering to myself if I should find a middle ground between a super wide flat bar and the more narrow drop bars. Right about this time an email from Hilary at PNW dropped into my inbox. It just so happened that they were releasing a pair of gravel oriented drop bars in 48cm and 52cm widths. The bars have a more shallow drop and a shorter reach than typical road oriented drop bars which is nice for keeping your position more upright and relaxed on, say, rides across Morocco. We decided to run the bars on the race bike and after a couple of weeks of riding on the bars I’m really glad to have them. The wider stance is definitely nice offroad and it allows more room between the bar for the front tent / sleeping bag roll while still allowing me room to put my hands anywhere I want on the bar.

David at Sinewave – I asked around a bit about the go-to bikepacking headlight and a lot of people said K-Lite was the way to go. I have no doubt that K-Lite are bomb proof and super legit for bikepacking but I didn’t end up going with K-Lite because the system has a lot of individual parts to consider and with the chaos of the holidays I wasn’t able to get any assistance in properly speccing out a functional parts list. As time started to dwindle I went with what I knew worked: The Sinewave Beacon. 90/10 of the dynamo bikes we build here at Rodeo go out with a Beacon headlight on them. Most of those are by customer request, but going into the darker months of fall Sheldon here at The Lab started running one on his winter commuter and has had nothing but good things to say about the light. The lumen output is phenomenal, the beam pattern is great, and my favorite detail is that there is only one thing to buy. All of the weather sealed electronics are contained within the headlight unit itself which keeps system complexity as low as it could possibly be. The Sinewave also offers USB charging for my Wahoos or other electronics and can itself be powered by external USB power when the bike isn’t moving and isn’t powered by a dynamo hub. Special thanks to David at Sinewave for getting my raw silver headlight out in time even though they were very buried in orders. I ordered a silver light knowing that we would Cerakote it to match the rest of the bike and it turned out awesome.


Every other part on the bike was carefully considered for the race, so here are some additional thoughts on what / why I’ve chosen to use. I’ll preface all of this by saying that I pick parts that I like, not parts that I’m incentivized to ride. Some brands do send us parts at no cost but we have plenty of parts here at the office that we’ve been sent that I wouldn’t run on any of my personal bikes. Our recommendations and personal bike build specs are never up for sale and I can’t imagine using or vouching for a part I don’t love.

Ride Farr aero grip – I first purchased and put this aero grip on my bike for Dirty Kanza last year. I’m not a fan of aero bars even if at times they offer material benefits and time savings. A part of me just gets sad when I see aero bars on gravel bikes. That’s a personal opinion though so you do you and I’ll do me and there is plenty of room in the world for differing opinions on that. The Ride Farr bars different from aero bars to me. For me they are about additional hand positions with which to change things up on very long rides. The Farr aero grips weigh almost nothing which I love. I’m still coming to grips with how heavy bikepacking builds are so every gram I could save felt meaningful. People ask me quite often if these grips are sketchy and if I can control the bike well when using them. Of course I can! Who knows, maybe that varies person to person but I feel very comfortable when I hit a predictable stretch of road or gravel road and I can tuck into the grip position and cut through the air just a bit more efficiently. Bonus: The bars don’t clutter up my cockpit. Extra bonus: By adding a small hole to the tip of the bars we were able to create a very functional mounting position for the Sinewave headlight.

Shimano Dynamo hub – I feel like I need to explain my dynamo generator hub choice for this race because it doesn’t seem to be the typical choice. For dynamo hubs we most often hear the names Schmidt, Son, and Shutter Precision as go-to hubs. I think tradition and reputation drive the generator hub market, and understandably so because nobody wants a generator hub to fail! But once again I took notes from Sheldon on my hub choice. He had been testing the very non-fancy Shimano hub on his commuter bike in all conditions for months and it has been performing like a champ. The Shimano only comes in 32h so there is that, but I chose 32h for my wheels in this race for the sake of redundant strength regardless of whether or not a 28h dynamo was an option. Here are some other interesting thoughts about the Shimano hub: 1. It spins wonderfully smooth right out of the box. SP and other brands of hubs have a very notchy feel when new which probably goes away a bit with break-in, but the Shimano just feels smooth and ready to go. 2. The Shimano hub despite being significantly less expensive than any of the other hubs mentioned also manages to be just the lightest hub of any of the hubs I’ve mentioned. Wait… good value, light weight, smooth feel, and reliable operation can all be had in a single hub? It was an easy choice to go with.

Redshift Stem – I have nothing but good things to say about Redshift suspension stems. I’ve used them for thousands and thousands of miles over the last couple of years and they have never let me down. They soften up the front end of the bike and reduce fatigue, they bolt on and off in five minutes, they aren’t ugly, and you can tune the suspension rate on them with the included elastomers. In terms of bike feel for rugged riding this is easily the best single part I would suggest to someone who is shopping for comfort. Many people at Atlas Mountain Race will be using front suspension or full suspension bikes, and others will be on Lauf front suspension bikes, but I feel confident that between the Redshift stem and my 2.1″ tires I’ll have a front end that is compliant enough to get me to the finish efficiently and as comfortably as I need.

Cane Creek eeSilk suspension post – I first purchased and installed the eeSilk for the 2019 Dirty Kanza 200 race. I had in previous years been experiencing ever increasing lower back fatigue while cycling in rugged conditions. So much so that in the days or week after a particularly grueling ride I could barely bend over in the morning to put on shoes. I kid you not that once I installed the eeSilk not only did my mid ride back fatigue drop by 80-90%, but I also didn’t have those post ride pains and symptoms that I had been struggling with. It is quite a thing to say that a single bike part changed my life, but the eeSilk post absolutely has changed mine. I did test the RedShift suspension post in these past few weeks as well and I would say that it feels even more compliant and active than the eeSilk. It honestly almost feels like I’m on a dual suspension mountain bike. It’s that plush. I’d recommend it for people who are looking for next-level seat and back comfort. But I did stick with the eeSilk for Atlas Mountain Race because it is significantly lighter than the RedShift and I am paying attention to the grams. As a final touch I disassembled the eeSilk and we also Cerakoted it to match the frame.


TRP Hylex RS / Shimano Di2 shifting – After six years of Di2 in my life I quite honestly never really want to go back to mechanical shifting so it was a near no-brainer to use Di2 for Morocco. Yes, I did consider that electronics fail from time to time and I could be left in a pinch out there if something goes wrong. I’m bringing extra Di2 wires just in case one shorts out and I’m bringing a second fully charged Di2 battery as well. I won’t bring a charger during the race because between two batteries I’ll have enough charge to do the race twice. I stayed with TRP Hylex RS brake levers because I love the feel of them so much. The caliper feel is also phenomenal. The drilled aluminum brake levers are easily removed and serviced in this system so we pulled them off and added them to the batch of parts that we Cerakoted to match the bike. At this point I’m getting a little bit self conscious that the bike is too good looking, but if you’re going to build a bike why not have a bit of fun making everything match? I do feel extra pressure to at least finish though! I am using Shimano GRX 160mm vented rotors to help haul the heavy loaded bike down from speed.

Wayward Riders seat bag cradle – I went a little bit into no-man’s-land on the seat pack setup. There are a million legit, proven seat bags on the market and I should probably stick with the most reliable proven thing for a race like this. But this is also Rodeo Labs and we like to experiment, so as soon as Greg pulled the minimalist Wayward Riders harness out of his bag I knew I wanted to try it. I used a Sea To Summit waterproof drybag stuff sack and the actual bag part of the assembly. Did I do that because it was orange? I plead the fifth. But I also did it because the entire assembly is very very light and I’m not worried about tearing it so much in the desert like I would be if I were riding through a forest. I’m using an identical Sea To Summit bag as my handlebar roll. I love it.
Ritchey WCS Skyline Ti saddle – I typically run a 120g carbon Selle Repente saddle for all my riding and have for over a year. It is comfortable and awesome but I’ve never ridden a hundred miles a day for seven days in a row before so I decided to opt for the Ritchey Skyline saddle instead. The Ritchey saddle is 150g heavier than the Repente but I think that it is weight well spent. A saddle sore or fatigue would more than offset the time I would theoretically gain with a lighter saddle at Atlas Mountain Race
Other bits worth mentioning:

Easton EC90sl crankset. I’ve had this crankset for a couple of years now. I move it from favorite bike to favorite bike. It is super stiff, reliable, extremely light, and the Cinch chainring interface is awesome for swapping out rings without a fuss. I’m also running the spindle based Cinch power meter because I’m a nerd and it’ll be fun to see what power output looks like in this sort of event. The crankset is spinning on a third party ceramic bearing bottom bracket that we are testing right now. Atlas Mountain Race seems like a good test for a bottom bracket!

Xpedo M Force 8 Ti SPD style pedals – Once again I’m a nerd. My friend David told me about these and how light they are. I used to run Eggbeaters on my dirt bikes but after a massive pedal failure at DK I decided to switch to Ritchey WCS XC pedals. Those have been great but 215g the Xpedo pedals are 80 grams lighter than the 298g Ritcheys. The Xpedo do have a rider weight limit of 187lbs. I weigh 177lbs so I think I’ll be okay. I hope. Oh boy.

Spork cargo setup – Once again Greg had some great advice for the fork. He suggested using the Wolf Tooth B-Rad system to split the single bottle cage fork mount on Spork 2.0 to create four possible mounting points on the fork legs. The two aft mounting positions on each leg are for the bottles which become easier to reach, and the two fore positions are used to mount Problem Solvers Bowties which then are used to mount Apidura Fork Mount bags. The fork mount bags are easy access stuff sacks for my rain jacket, gloves, and down puff. The bottle cages are Arundel Looney Bins which are adjustable just in case you want to carry a fat bottle of Gatorade, a Nalgene, or a standard water bottle. Oh, and they also don’t eject bottles when the going gets rough!
Brooks bar tape – I thought about doubling up my bar tape thickness for this race but between the huge tires and Redshift stem I thought I was covered for vibration dampening and I went with some nice tan standard Brooks tape instead. Plus it matches and that’s VERY important.
I think that covers most of the main gear choices on the bike. If I think of anything else important I’ll add it to this list. If you have any questions about my gear feel free to post a comment and I’ll respond as time allows.
My final thought is this: I’m incredibly proud of the Traildonkey platform. For me it is mind boggling to think that a bike that started out as a wild hair in my head in 2014 has evolved into such a capable beast in 2020. My goal for Atlas Mountain Race is to simply finish and experience the beauty of Morrocco and the bikepacking community first hand. I’m not trying to win, but I am hoping to put in an effort that I can be proud of. If I do finish then I’ll be able to say that I’ve ridden and raced Traildonkey in road races, in cyclocross races, in gravel races, in mountain bike races, and now a bikepacking race. The idea that a single platform can cover such a huge spectrum, one that is even wider than I ever imagined, makes me deeply proud of what we make. My deep goal for our bikes is that they be inspired by the conditions that they are ridden in first and foremost. I can’t wait to find out what Atlas Mountain Race and Morocco inspire next at Rodeo Labs.


20 responses to “Stephen’s Atlas Mountain Race spec Traildonkey 3.0”
Awesome bike!!! I love the color choice on the bike. Sand and the red of the buildings of Marrakesh.
I was in Marrakesh in January for a couple of days and starred at the Atlas mountains. I wish we had planned more time to go out there. The country is beautiful, the people super friendly. I’d love to go back and then ride out there.
If you get a chance, I recommend two places in Marrakesh we enjoyed.
The rooftop hang-out SHTATTO in the medina, especially for a fresh juice, tea or food at sunset.
https://uploads.disquscdn.com/images/8ef46376b8f03c3f62a4b742c0db2982e4f85b646659464f5fe90d2398615769.jpg
And Cafe Kif Kif near the Jemaa el-Fna market for it’s nice and typical local food and casual atmosphere.
https://uploads.disquscdn.com/images/31b76923043831cec8626c4e9fed5572b64ecb360864d447afbc0e7bb0e40480.jpg
And should you fly via Frankfurt; Germany with time to kill, I’d be happy to meet up and show you around. Maybe we can even talk about my next dream bike based on the new Flannimal 5.0 frame?
Thanks for the tips Philip! These places look great and I’ll be sure to visit them. I would love to swing through Germany on the way back but I’m actually going to stay in Morocco for a bit after the race to try to enjoy the country at a slower pace. That will use up all of my available time away from the family and the office. Hopefully I can get an EU trip in this year. There are some ideas brewing.
Flaanimal 5.0 is ordered. Just sayin’! 😀
This is so incredibly dialed. Well done. Looking forward to seeing coverage of this bike in Morocco!
Thanks Scott! Only the hard part is left: Pedaling! 😉
Stephen, I am a woman rider from upstate NY who got hip to Rodeo through some Bike Porn a friend sent me from this year’s Philly Show. I have been following you ever since. Rodeo’s design and ride philosophy, and moreover your eloquence when fielding the wayward naysayer when it comes to your design explorations/choices are inspiring. I can not wait to have the pleasure of owning and riding one of you bikes! Recently I was not quick enough to the draw on one of the last Flaanimal 4.1’s because of too much tinkering and vacillating over the TD3 v Flaanimal. Now awaiting 5.0 like a kid waiting for Christmas – checking the website almost daily to keep up what you are all doing and when 5.0 drops. It is refreshing to know there is a group building and riding for the pure experience of synchronicity between bike, human and environment! All the best in Morocco! May it challenge and inspire you. I can only imagine what that night sky will be like! As for your Atlas Steed = Sensational!
Beautiful bike! Thanks for sharing. Good luck in Morocco!!!
Beautiful set up. Love the color scheme!
Great set up! One question on the Wahoo stem mount: Is that the standard Wahoo stem mount modified to fit the flat RedShift stem or is it something else (if so, what)? (Was that one question or two?). Thanks!
That is the standard Wahoo zip tie mount.
Hi Stephen: I have a question about the set up of the bottle cages and problem solvers on the fork: being attached to the same bolts, how can you pass the straps around the problem solver? In my setup the bottle cage just prevent the strap to go around it… Thx.
Are you using the Looney Bin cage? It is a tight fit when mounting but does not interfere so much that I can’t install or remove the bag at will.
Yes, the issue is that the bin Cage and the Problem Solvers are attached at the same Wolftooth adapter: therefore I could not pass the strap around the bag, as it interfere with the bottle cage. I have solved it with another gorilla…
Just saw this. Curious about your Di2 setup for a difficult and remote race like this. The PNW bar is not Di2 compatible (that I can see), but I don’t see any Di2 junction boxes anywhere, and I’m not sure if the Cane Creek seatpost is Di2 compatible. Where did you put all of the various junction boxes and battery so that it would survive the race?
Also, super well thought out component selection. Each part was considered and chosen for a specific reason. Awesome!
Steve
Steve. I modified the PNW bar with a tiny hole underneath the flat bottom part of the drop bar then used the DI2 bar end junction. I can’t recommend drilling a handlebar for liability reasons but here at Rodeo I’m a lab rat and I do things on my personal bike that I wouldn’t be able to do on a customer bike. I’m not sure that a seat post has to be Di2 compatible in order to fit a Di2 battery. If the post is hollow a battery will fit. It worked great in my post with a standard Di2 rubber plug mount. My junction B fits very well up by the head tube inside the frame. I had 40% battery life left at the end of the race and there were no Di2 issues save for some ghost shifting I encountered by accidentally triggered on hike a bikes. I had to learn to be mindful of my hand position on the bars so as not to accidentally shift when not pedaling. Static shifting is always bad for a drivetrain.
Thanks for the clarification. Considering Di2 for a gravel/adventure/bikepacking bike, and your description is exceptionally clear. I’m guessing that if it survived the race intact, with 40% battery life, that is good enough for any remote ride I will ever do. Never thought about the static shifting with Di2. I guess the motor tries to move derailleur, even if the cranks are not moving. This sounds like when I was a little kid and got my first 10 speed, and everyone warned me about always pedaling when you are shifting, or you would “strip the gears”.
I really love your story about the AMR – thanks for sharing with us. The videos are awesome. I read so much about the AMR also from other riders. Noone captured the race (and the time before) as nicely as you did. It feels like beeing on the race reading through it and watching the videos. How did you mount the camera to the handlebar and which system did you use (and which camera)?
Dave,
Thanks for the kind words! I mounted the Rylo 360 camera at the end of an extendable pole that was clamped to the stem. Just like a lance extending from the front of the bike. It works very well, just don’t crash! (I crashed and destroyed one camera, but I had a second in my bag).l
Great write up and reasoning behind each choice!! Looking at the pictures I notice you have the remote shifter on both levers. I have a nearly identical setup with the right shifter for the rear derailleur. Is the left brake shifter set as a redundancy, or is it controlling something else?!
I have shifters on both side even with the 1x because I’m often taking photos with my right hand, and then I hit a hill and need to shift and only my left hand is free.